IMPORTANT NOTE
THIS GUIDE WAS DEPRECATED IN JANUARY 2022.
PLEASE REFER TO THE NEW GUIDE AT "Plugins: Connect The Things Stack to Ubidots"
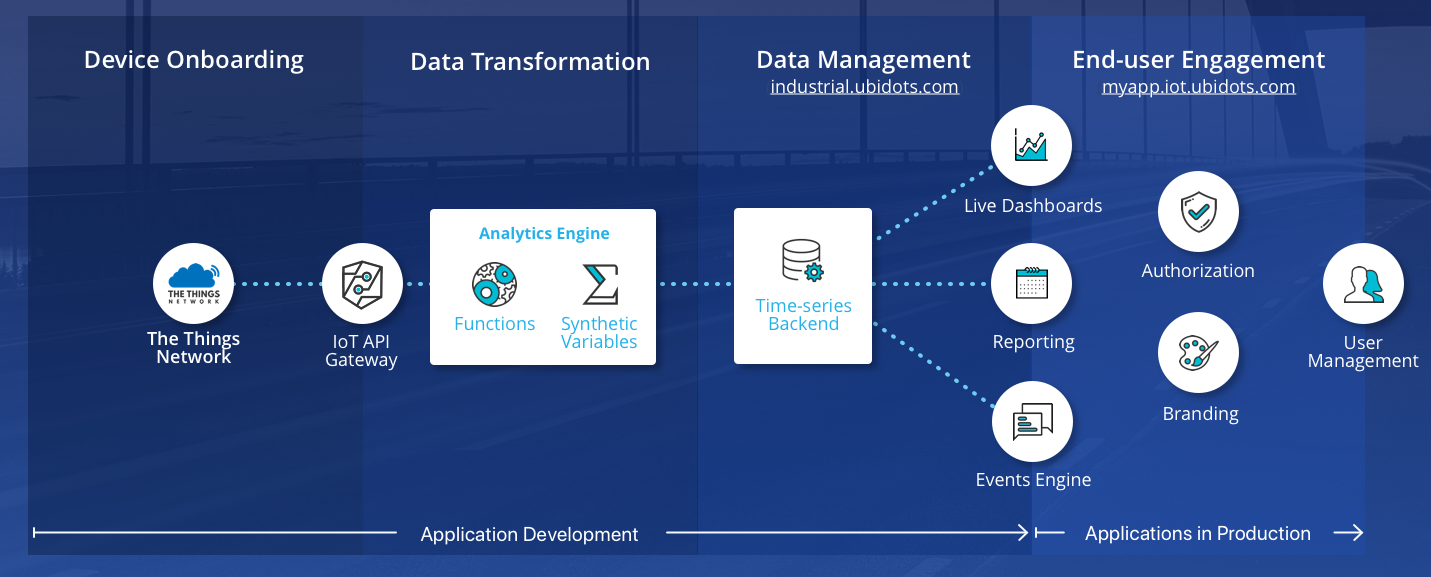
The Things Network (TTN) is a LoRaWAN network specifically designed for more efficient device communication with the internet, minimal battery requirements, and a long-range and low bandwidth protocol. You can learn more about The Things Network from their official web page.

Using this Simple Setup Guide you will be able to stream your TTN data directly to Ubidots where you can further develop and deploy your IoT Solution for end-user engagement.
Using the TTN + Ubidots official integration, there's no need to create webhooks and UbiFunctions to communicate. With this simple setup you now just need to provide your Ubidots TOKEN and your TTN data will be automatically sent to Ubidots!
Read more of about Ubidots and TTN's joint effort to enable IoT Solutions.
NOTE: The manual webhook integration from TTN to Ubidots can be found here. This manual setup utilizes the UbiFunctions add-on to decode a TTN payload.
Requirements
LoRaWAN Gateway & Devices already transmitting data to TTN
Step-by-Step
About LoRaWAN Payloads
Sending payloads to Ubidots - Overview
How to Decode your LoRaWAN Payload into Ubidots Format
– Building the Decoder function in TTNAdding the Ubidots integration from TTN
Visualize your data in Ubidots
1. About LoRaWAN Payloads
Low Power Area Networks (LPWANs) such as LoRaWAN have become a great option for IoT deployments thanks to their long range and battery-efficient communication. To achieve this, LoRaWAN devices transmit smaller data packets at low speeds, saving bandwidth and battery consumption.
This means that most LoRaWAN devices are designed to transmit simple binary data payloads in bytes, as opposed to strings or text, allowing for smaller, more memory efficient packets and payloads.
2. Sending Payloads to Ubidots - Overview
While binary payloads are great for LoRaWAN devices, most web APIs are designed to understand JSON payloads and Ubidots is not the exception. As a reminder, here's Ubidots' expected JSON payload structure:
Example Payload Structure:
{
  "variable_label" : "value"
}
Example Payload:
{
  "humidity": 60.3,
  "temperature": 57.19
}
You may want to check out Ubidots API docs to learn more about acceptable payload structures for Ubidots platform.
3. How to Decode your LoRaWAN Payload into Ubidots Format
Luckily, TTN has a built-in tool called "Payload Functions", which allows you to decode binary payloads (in bytes) to JSON payloads.
IMPORTANT NOTE: The management of data as bytes can be a little confusing at first, but this helpful guide will help you to better understand bytes. It is highly recommended that you review this guide and the video below if you've never decoded a byte payload.
To learn how a binary payload can be decoded into a JSON payload, we'll code an example function that receives a binary input and returns a JSON output as shown below:

Building the Decoder Function in TTN
To build this decoder (using the above example), go to the Applications section within your TTN account, then click on "Payload Formats". Make sure "Custom" format is selected, and you're sitting in the "Decoder" tab:
"Application" –> "Payload Formats" –> "Custom" –> code

Enter the following code for decoding function:
function Decoder(bytes, port) {
  var temperature = (bytes[0] << 8) | bytes[1];
  var humidity = (bytes[2] << 8) | bytes[3];

  return {
    temperature: temperature / 100,
    humidity: humidity / 100
  }
}
NOTE: You will need to adjust this decoder code to match your LoRaWAN devices' data format. If you need any help doing this, feel free to Ubidots IoT Application Engineers a note through our in-app chat channel or at support@ubidots.com
4. Adding the Ubidots Integration from TTN
Now you're just 1 step away from seeing your data in Ubidots. With the decoded active, click on "Integrations" within your TTN account, then click on "Add integration" and select "Ubidots."
"Applications" –> "Integrations" –> "Add Integration" –> "Ubidots"

Next, give a customized name to your new integration (in this guide we simply called it "ubi-integration").
Then, select "default key" in the Access Key dropdown menu. The default key represents a "password" that is used to authenticate your application in TTN.
Finally, enter your Ubidots TOKEN where indicated in the TTN user interface.

5. Visualize your data in Ubidots
Finally, upon successful creation of the decoder for your application's data payload with the TTN integration, you will be able to see your LoRaWAN devices automatically created in your Ubidots account.
Please note this integration will automatically use your DevEUI as the "Device API Label," which is the unique identifier within Ubidots used to automatically create and identify different devices:

Because Ubidots automatically assigns the Device Name equal to the Device API Label, you will see that the device does not have a human-readable name. Feel free to change it to your liking:

In this article we have learned how to send data from TTN to Ubidots using the TTN's official integrations.
Other users also found helpful: