
This article looks to illustrate what can be achieved with the Widget Plugin tool rather than going into specific technical details.
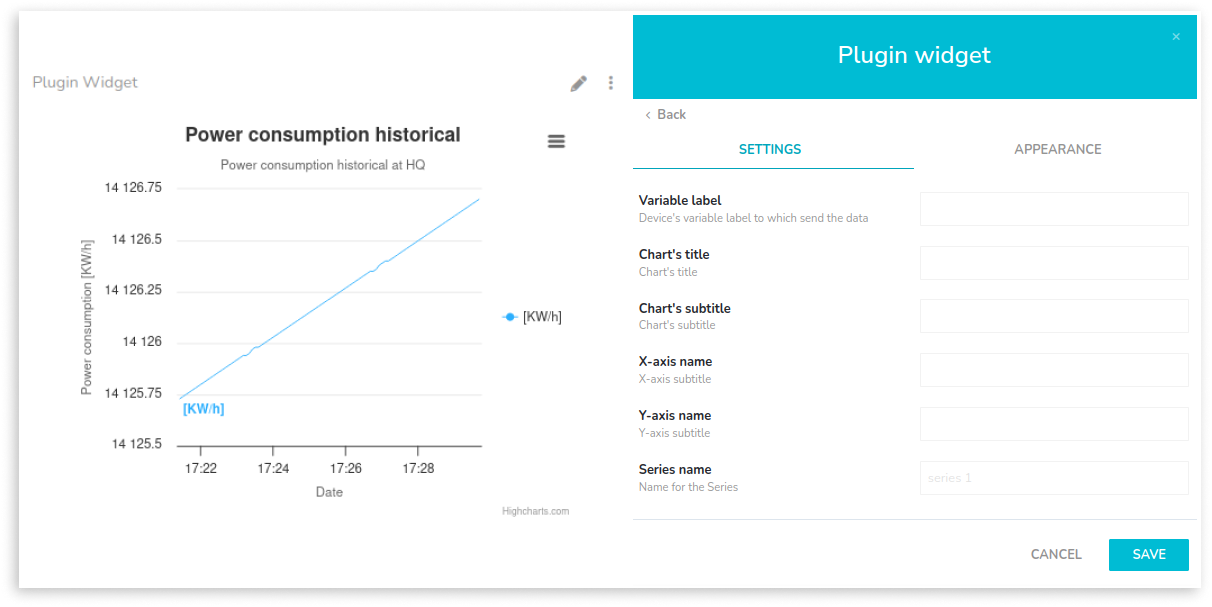
The screenshot shown above showcases a widget developed using Ubidots' Widget Plugin. This tool empowers Ubidots users with the ability to develop widgets tailored to their application's specific requirements, catering to a broad spectrum of industry verticals. Widgets developed using this tool are added to the catalog of native widgets.
Requirements
An Ubidots Enterprise license.
HTML, CSS, and JavaScript knowledge.
1. Widget Plugin vs. HTML Canvas Widget
While the widget shown in the previous screenshot can also be developed using the HTML Canvas widget, using the Widget Plugin offers the following advantages:
Concept | Widget Plugin | HTML Canvas widget |
Modularity: The widget is self-contained, making it easier to manage, update, and deploy, avoiding having to manually copy/paste code. |
Yes |
No |
Reusability: The widget can be deployed as an Ubidots native widget for the account owner and his/her users. |
Yes |
No |
Version control: The widget can maintain different versions. | Yes | No |
Security: The source code is private. | Yes | No |
2. What is Widget Plugin?
Widget Plugin is a tool that allows you to extend the native catalog of widgets, for you and your end users, in order to meet particular visualization and business logic needs. Widgets created using this tool become available as native widgets in the dashboards' drawer.
3. Widget Plugin life cycle
The life cycle of a custom-developed Widget Plugin is as follows:
Developer's viewpoint:
The developer creates a widget plugin intended for their end users.
The developer deploys and installs the widget plugin to the account so it becomes available as a native widget in the dashboards' drawer.
End user's viewpoint:
The end user sees the widget in their dashboards' drawer.
The end user creates the widget in any of their dashboards.
The process is further illustrated in the following sequence diagram:

Note: It's recommended to develop the widget plugin on your local PC.
4. Developing a widget plugin
The developer writes custom logic in JavaScript and designs a user interface using HTML and CSS.
To start building a widget plugin, the developer should first create the required files following this exact file structure and naming convention:
├── src
│   ├── static
│   │   ├── widget.css
│   │   ├── widget.html
│   │   ├── widget.js
│   ├── view.xml
│   ├── view_widget.xml
│   ├── control.py
│   ├── function.py
│   ├── user_code.py
├── LICENSE
├── manifest.toml
├── README.md
Note: Adhering to this structure and file naming is crucial. Otherwise, it will not be possible to deploy the widget plugin.
File | Description |
widget.js | Holds the widget's logic written in JavaScript. |
widget.html | Defines the UI layout. |
widget.css | Defines the layout styling. |
view_widget.xml | Defines the settings of the widget.
After developing and installing the widget plugin, users will be able to create instances of the widget. To create the instance, they will have to configure the settings defined in this file. |
view.xml | Specifies the widget plugin's settings when installing it. |
control.py | control.js | Code here runs when installing the Plugin in the account. |
function.py | function.js | Acts a back-end for the widget. It can trigger over HTTP from the widget.js code. |
user_code.py | user_code.js | It can be use as an additional place to expose custom code. |
LICENSE | Has the license set by the developer. |
manifest.toml | Widget plugin's configuration file. |
README.MD | Widget plugin's guide. |
Note: The technical details of these files won't be addressed in this article. For detailed information, head to our full Dev Center documentation.
5. Deploying the widget plugin
In order to deploy a widget plugin to Ubidots, you'll need to create and upload a .zip file containing all the files described in the previous section. Make sure they are all in the root of the zip.
We have prepared an example of these files following the structure described above, which reproduces the widget (and its settings' drawer) shown at the beginning of this article. You can download the zip file for this widget from the following link:
Then, head to Ubidots → Devices → Plugins. Once there, click on the developer console icon:

Click the "+" button to create a new plugin, name it and give it a description, then hit the green check mark button. After that, your new plugin will be created:

Click the newly created plugin's name. While in the "general information" tab, click on "add plugin icon" to add the icon that will be displayed on the plugins drawer. Finally, click on the "save" button within the "display information" section. You can download the icon from here.

Scroll down to the "plugin description" section and, there, paste the following readme and click on the "save" button within that section.
# Ubidots Highcharts Widget
Visualize your Ubidots variable data using the Highcharts graphing library with this widget. Easily configure titles, axis names, and more!
## Features
- Seamless integration with Ubidots.
- Real-time fetching of variable data based on the provided label.
- Customizable graph elements like title, subtitle, x-axis & y-axis names, and the series name.
## Table of Contents
- [Ubidots Highcharts Widget](#ubidots-highcharts-widget)
- [Features](#features)
- [Table of Contents](#table-of-contents)
- [Prerequisites](#prerequisites)
- [Setup and Installation](#setup-and-installation)
- [Widget's inputs](#widgets-inputs)
- [License](#license)
## Prerequisites
- An active Ubidots account with Enterprise license.
## Setup and Installation
1. Log in to your Ubidots account.
2. Navigate to the **Dashboards** section and select the one in which you want to place the widget.
3. Click on **Add Widget** and select **HighCharts widget**.
## Widget's inputs
After adding the widget to your dashboard:
1. Configure the widget settings:
- **Chart's title**: Define the main title of the graph.
- **Chart's Subtitle**: Provide a subtitle, if needed.
- **X Axis Name**: Specify the label for the x-axis.
- **Y Axis Name**: Specify the label for the y-axis.
- **Variable Label**: Click on the "ADD VARIABLE" button and follow the variable selection wizard.
- **Series Name**: Define the label that will be displayed within the graph line.
2. Save the changes and the graph will automatically fetch the data and display it.
## License
This project is licensed under the MIT License. See the `LICENSE` file for more details.
Go to the "versions" section in the sidebar menu. Click the "+" button and upload the .zip file.
NOTE: You MUST name the zip file differently than it original name.

The plugin is now in your Ubidots account, but it needs to be released and installed before use.
To do this, just click on the "release" button to publish the plugin in your account:

A confirmation will be displayed, click the "release" button:

After that, your plugin's status will change from draft to released and will be ready for installation:

6. Installing the plugin
Go to the Plugins section and click on the "+" button. Then, in the plugins' drawer, search for the plugin that you just created (in our example, "HighCharts custom widget"), fill in the required "Ubidots token" field, and click the "done" button. After that, you'll be able to see the newly created plugin:

Note: Please make sure to go through the README in order to know how to use this widget.
The form displayed when creating the plugin:

This corresponds to the elements present in the view.xml file.
7. Creating the widget
Once done, go to any dashboard and click the "+" button. Look for your widget and click on it.

Configure your widget. In our example, we'd have to fill in the fields shown in the following screenshot:

These correspond to the elements present in the view_widget.xml file.
Finally, this is how our widget looks like once it's created in the dashboard:
